| Work in progress |
Okay, you've seen those tasty logic blocks in-game, but how to use them? This page is meant as a simple set of examples to get you familiar with the logic blocks. It is not meant as a full, complete description of every single logic item, just a run down of the basics to get you going!
Prerequisite knowledge[ | ]
Before starting on the logic blocks discussed on this page, make sure to check page on Basic Logistics! Note that this page is still work in progress as well.
Basic splitters[ | ]
important note: making connections between logic blocks is done with RMB (right-click). selecting the toggle block and turning it on/off in the top corner only changes its state, it does not send the signal forward. normally the toggle block is used somewhere inside a larger logic circuit. if you want to use the toggle as a "user input", you have to ctrl-LMB it.
Basic 2-way splitter using Agent Trigger[ | ]
Update: As of v0.044, a basic splitter block has been added to the game. Before that, a combination of logic blocks was needed to perform this splitting action. However, it is still a good exercise to try and make these yourself, to get an initial feeling of how to use logic blocks. This information can also be useful later on, when you want to make customized splitters that can't be easily made from basic splitters.
Here is an example of creating a simple splitter. A Pusher is the active splitting component and a Toggle saves its state. The splitter is triggered by an Agent Trigger. The Agent Trigger sends out a signal whenever an item enters or exits its block. Note that connections between logic blocks are made by selecting the first block and then LMB (left-clicking) the second block.
Update: As of v0.040, it is now possible to use an offset on the agent trigger, just like the inventory sensor.
Basic 2-way splitter using Inventory Sensor[ | ]
It is also possible to make a splitter using an Inventory Sensor. While the Agent Trigger is the most simple solution, The Inventory Sensor offers more possibilities. The Inventory Sensor can send out the exact amount of items of the square it is checking (which can be useful later on in the use of Minecarts). It can also check other locations than its own square (an offset), so it can check exactly at the Pusher's location. When the block is selected, it shows a blue line to the square it is checking.
2-, 3- and 4-way splitter examples[ | ]
The same principle can be extended to split an input into multiple outputs. Here are examples of using the same Agent Trigger system for a 2-, 3- and 4-way splitter.
Set, Push, Number, Math and Counter blocks[ | ]
Set, Push and direct connection, what's the difference?[ | ]
In Factory Town, Logic blocks are used by sending a signal through them (in contrast to reading off a constant signal). This means that in order for blocks to have an effect on the output, there needs to be a 'flow' of a logic signal through those blocks.
there are 3 ways to connect blocks to each other.
- The first option is a direct connection. A direct connection affects the next block (as in, changing its state or value), and also sends the signal to any subsequent blocks.
- A Logic Set block changes or specifies the value of the next block, but does not push the signal on to following blocks.
- A Logic Push block is the opposite, it does not change the next block, but only passes on its value to subsequent blocks. Note the difference with Pusher blocks, which physically push items and Minecarts in a direction.
This is best explained by examples. First off: Logic Push.
The video below shows a direct connection at the top, while showing off the function of Push at the bottom. Here you can see that no matter the "1" or "0" (On or Off) incoming signal of a Toggle, the Push does not change the next block, only passes on the value the next block already has. This can be useful when you want a button to always give an "1" signal, for instance when turning circuits On or Off, no matter what state they in before that.
Next: Logic Set.
In the video below, a Logic Set block is positioned vertically. Here you can see that the set block changes the state or value of the next block, but does not push a signal onward. This in contrast to the Logic Push (in the horizontal setup) that pushes on the signal without altering the state of the next block.
Now that we have discussed the basics of Logic Push and Set blocks with toggles, let's get on to using numbers!
Number Block[ | ]
A Number block is a block that can hold a number and pass it on to other blocks. The value can also be manually set.
- A direct connection sets the Number block to the input value and passes on the signal.
- A Logic Set block only sets the value of the Number block.
- A Logic Push block only pushes on the value to subsequent blocks without changing it.
Examples of all three connection types are shown in the video below.
A simple use of a direct connection is when you want to read out a value. This is for instance useful to read out the value of an inventory sensor (Note that you can connect an inventory sensor directly to math blocks to process the signal, having a number block in between only makes it visual what is going on).
In other cases when you are making complex circuits, it can be useful as well to inspect intermediary values. This is especially useful if your circuit isn't doing what you want and you need to figure out what is going wrong.
Later sections of this guide will show more complex examples of using Number blocks in with Logic Push and Logic Set in full circuits.
Math Block[ | ]
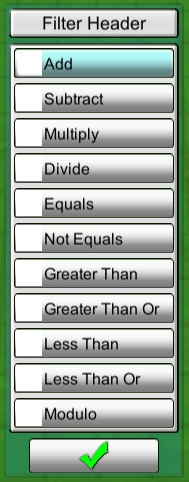
Math block operator options
A Math block allows for mathematical operations, such as +,-,*,/, to boolean operators, such as =, <, >, <=, >=. It also allows for calculating the Modulo (the remainder after a division, as in, '5 mod 4 = 1'). For the full description, see [link to Math block description]. The most important thing to remember, is that Math blocks don't 'read' a signal from another block. Instead, that other value has to be 'pushed through' the Math block. To do that, use the "Process Left Value" instead of "Set left value" command.
The video in the Number block section already shows some examples of the output from math blocks when they have a direct connection. This video also shows that the output value of a Math block depends on its input. Keep in mind that this is also the case for an Agent Trigger or Toggle, whose outputs of On or Off are taken as "1" or "0".
When a Logic Push block is used directly on a Math block, it repeats its last output given. Note that the output is therefore "0" when no previous values have been sent through the Math block.
The value of the Math block can be manually entered, but can also be set with the Logic Set block. Note again that the Logic Set does not pass the signal on, only change the value. This means that you can dynamically change the calculation that is made with the signal passed through the Math block, or in this video, a boolean comparison:
At the bottom of the page you can find an example of how to combine Math, Set and Push blocks to Add up inventory values of multiple buildings.
Counter Block[ | ]
Like the name suggests, the Counter block counts its inputs. In previous versions, the Counter block was the only block which could store a value. But as of v0.044, the Number block is used in most of these cases.
The same 3 ways to connect blocks apply to a Counter as well:
- With a direct connection, the Counter is increased by 1. It does not matter what the value of the input signal is, whether it is coming from a Trigger, Toggle, Boolean Function or Math block, any input increases the value by 1.
- A Logic Set block can specify the exact value of the Counter.
- A Logic Push block does not increase the value of the Counter, but pushes its value on to subsequent blocks.
With a direct connection, the Counter is always increased by 1:
When using Logic Set and Logic Push, the Counter block behaves the same as the Number block, so you can look at those videos for examples.
Reading out values of your circuit[ | ]
As of v0.044 this has been greatly simplified! Look at the examples of the Number block.
Making a switch to reset a Number or Counter block[ | ]
v0.045 has got a new bug with counters. This example will be made when that has been fixed!
How to subtract 1 from a Counter block[ | ]
v0.045 has got a new bug with counters. This example will be made when that has been fixed!
How to add and subtract 1 from a Number block[ | ]
In the example below you can see how you build a Plus-Minus counter using the Number block. The Number block to the right is the actual block you can use in the rest of your circuit. The number blocks center-top and -bottom are copies, only used for adding and subtracting values. When the Toggle is hit, the Logic Push pushes the value of that copy through the Math block, either adding or subtracting 1 from the value. The Number block to the right is then changed into that new value. The updated value is then copied to the top and bottom with the Logic Set block, ready for another addition or subtraction.
Timer Blocks and Signal Gates[ | ]
Timer Block[ | ]
Like the name suggests, all a Timer Block does, is wait for an amount of time. Any signal that is sent to the Timer, is delayed by the amount specified in the Timer settings and then sent onwards. The Timer can also be set to '0'. In this case it will wait exactly 1 logic tick (1/60 sec). Per logic tick, a signal gets sent to a next block in the circuit. So if you have a part in your circuit with fewer blocks that need to wait before a longer chain is finished, you can let it wait exactly the right amount of time this way.
How to use Signal Gate and Timer Blocks to only pass on positive signals[ | ]
The Toggle, Agent Trigger and Inventory Sensor all send out a signal every time they are triggered, so a 0 or a 1(or more) signal. But there are situations where you only want to send out positive signals, not the 0 signals (in electronics commonly referred to as an 'rising edge detector'). In these cases, you can block the signal using a Signal Gate block. A Signal Gate only allows signals through when it is turned on. This done either manually, or by using a Logic Set block. The video below shows how you can create a circuit that only passes the positive signal of a Toggle through, while blocking the 0 signal. The 0 signal from the Toggle itself is used to Set the Gate to Off. Here you can also see the use of a Timer block delaying the signal by exactly 1 logic tick. If we did not use the Timer here, the actual value of the Toggle would reach the Gate before the Gate could be closed through the Logic Set. In general, when the timing is off somewhere in your circuit, count the number of blocks the signal has to travel through.
How to make a clock using Timer blocks[ | ]
You can also combine two Timer blocks to make a clock. An example of this is shown below. The Timer on the bottom, the main Timer, is activated and waits for the set amount of time, then sends a signal out into the system and to the Timer to the right. This Timer to the right is set to '0' and sends the signal back, activating the main Timer again to repeat itself. In the example below a Signal Gate is used as well, which only allows the clock signal through when it is turned on by the toggle and the Set block. This allows you to turn the clock on and off.
How to use Signal Gate + Inventory Sensor to count specific items on belt[ | ]
Combining the signal gate with a counter: making a counter only count a specific item type on the belt.
Note that for belts, the Inventory Sensor can be replaced by an Agent Trigger, ending up with the same result.
For Minecarts you do need inventory sensors to count the content of the carts. And since Counter blocks only adds 1 at a time, it is better to switch to a Number block. In the video below you can see what the adapted circuit looks like. In contrast to the previous section, a copy of the Number block value is now stored in the + Math block, while the new inventory value is sent through it.
> Question: minecart examples interwoven here or as a separate section with minecart-only examples?
Advanced splitters[ | ]
Equal-N-way splitter[ | ]
(on belt)
Custom-ratio-N-way splitter, or Universal Splitter[ | ]
(on belt)
v0.045 has got a new bug with counters. This example will be made when that has been fixed!
Minecarts[ | ]
Difference between Pusher and Sorter on minecart trajectory[ | ]
This, combined with the new Filter and Blocker blocks, should be explained in the Basic Logistics Guide.
use of 'inverted sorter' as a stop for minecarts[ | ]
Since Sorters only allow the item through that has been set in the filter, you can use it as a stop block: set to an item type that you don't use, and it will block all your carts when turned on, as shown in the video below.
Keep in mind that the Sorter stops everything when turned on, and allows items through when turned off. So, if you use "On" in the rest of your system to start the flow and "Off" to stop the flow, then remember to invert the signal by using a NOT Boolean:
minecart loading station[ | ]
One property of Minecarts is that they keep moving. So if you want a more efficient transport system, you want them to wait until they can transport a full load. Here's an example of how you can build such a Minecart loading system, using an Inventory Sensor and an inverter Sorter as a stop: (using 5 instead of 20 to speed up the example)
Note the speedbump right before the Rail stop. The Sorter is triggered once the Silo is emptied. After multiple experiments it was found that when flat Rails are used, it is sometimes possible for a second Minecart to slip through (meaning it exits the Sorter block before it is activated). This is prevented with the speedbump, giving the first Minecart an acceleration, while slowing down the second Minecart.
However, such a speedbump doesn't look very good. So there's also a much better solution: using a Magic Rails to create a Minecart launcher!
(the magic Rails makes the first cart go fast enough for the Sorter to block the second cart again)
Difference between Agent Trigger and Inventory Sensor on minecart[ | ]
Using Signal Gate + Inventory Sensor to count specific items in minecart[ | ]
moved above to the Timer block and Signal Gate section.
making filter for empty minecarts[ | ]
- making filter for empty Minecarts, yet with the correct filter (or make an example of a 3-way filter: a)Minecarts with wrong filter, b) Minecarts with right filter, but empty, c) Minecarts with correct filter + filled)
Combined setup: Creating a minecart depot[ | ]
setting up Minecart depot, using counter to limit the amount of Minecarts on a given circuit
Random useful examples[ | ]
How to use an Inventory Sensor on a storage to control production[ | ]
The video below shows how you can
1) read out an inventory value from a storage building
2) use that value to turn off the supply to a production building
(Note: there are plans to control buildings directly instead of controlling the input)
Adding up inventory values of multiple buildings[ | ]
Here is a practical example of how you can combine Math, Set and Push blocks to count the combined inventory value of multiple storage units: